第317篇:模型驱动编程(MDA)在华为设备上的实现
关键词:MDA、模型驱动编程、eSDK、华为设备、Python SDK、YANG模型、自动化配置
一、引言
第315-316篇分别介绍了 gNMI/gNOI 协议和 Telemetry 流式数据推送。这些协议是模型驱动网络管理的传输层,但实际开发中,直接操作 gRPC 底层 API 过于繁琐。厂商通常会提供更高级的 SDK(软件开发工具包),将协议细节封装起来,让开发者用简洁的代码完成复杂的设备管理操作。
华为的模型驱动编程(Model-Driven Automation, MDA)正是这样一种框架:基于 YANG 数据模型,提供 Python SDK(eSDK),将 NETCONF/gNMI 的底层操作封装为面向对象的高层 API。
二、核心概念
2.1 MDA 架构体系
华为 MDA 的核心思想是:以 YANG 模型为驱动,自动生成代码和操作接口,开发者只需关注业务逻辑而非协议细节。
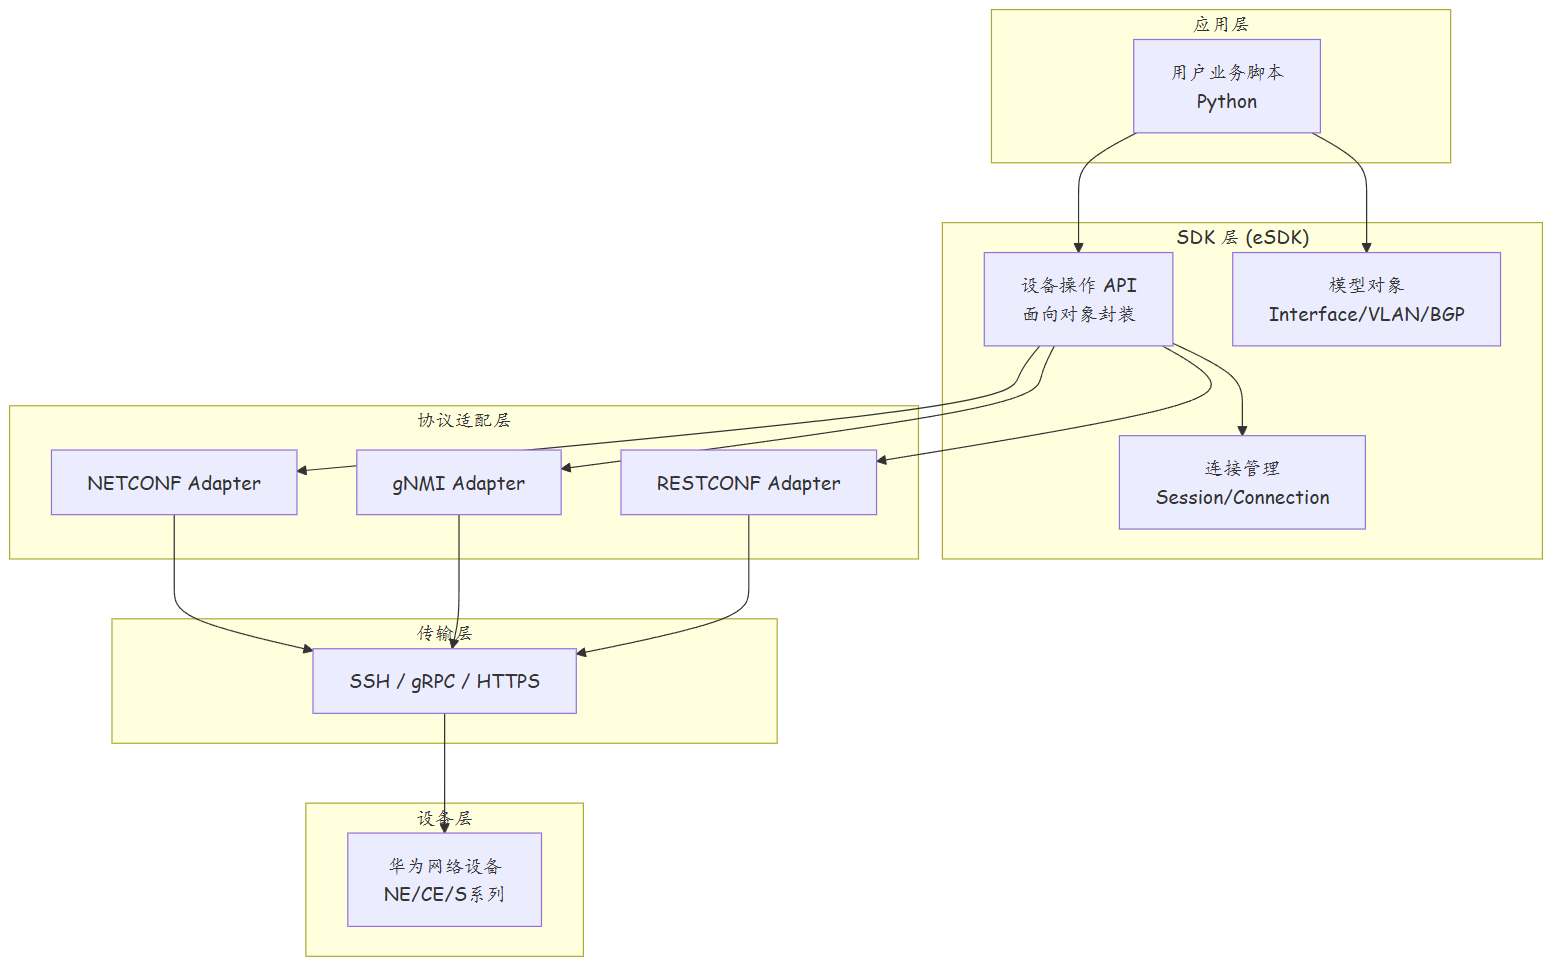
2.2 华为 eSDK 组件
| 组件 | 说明 | 用途 |
|---|---|---|
| eSDK NETCONF | NETCONF 协议封装 | 配置管理、数据查询 |
| eSDK Python | Python SDK | 面向对象设备操作 |
| eSDK ConfigGen | 配置生成器 | 基于模板批量生成配置 |
| eSDK Telemetry | Telemetry SDK | 接收和处理 iTelemetry 数据 |
| eSDK NCE | 网管集成 SDK | 与 iMaster NCE 对接 |
2.3 MDA vs 传统编程
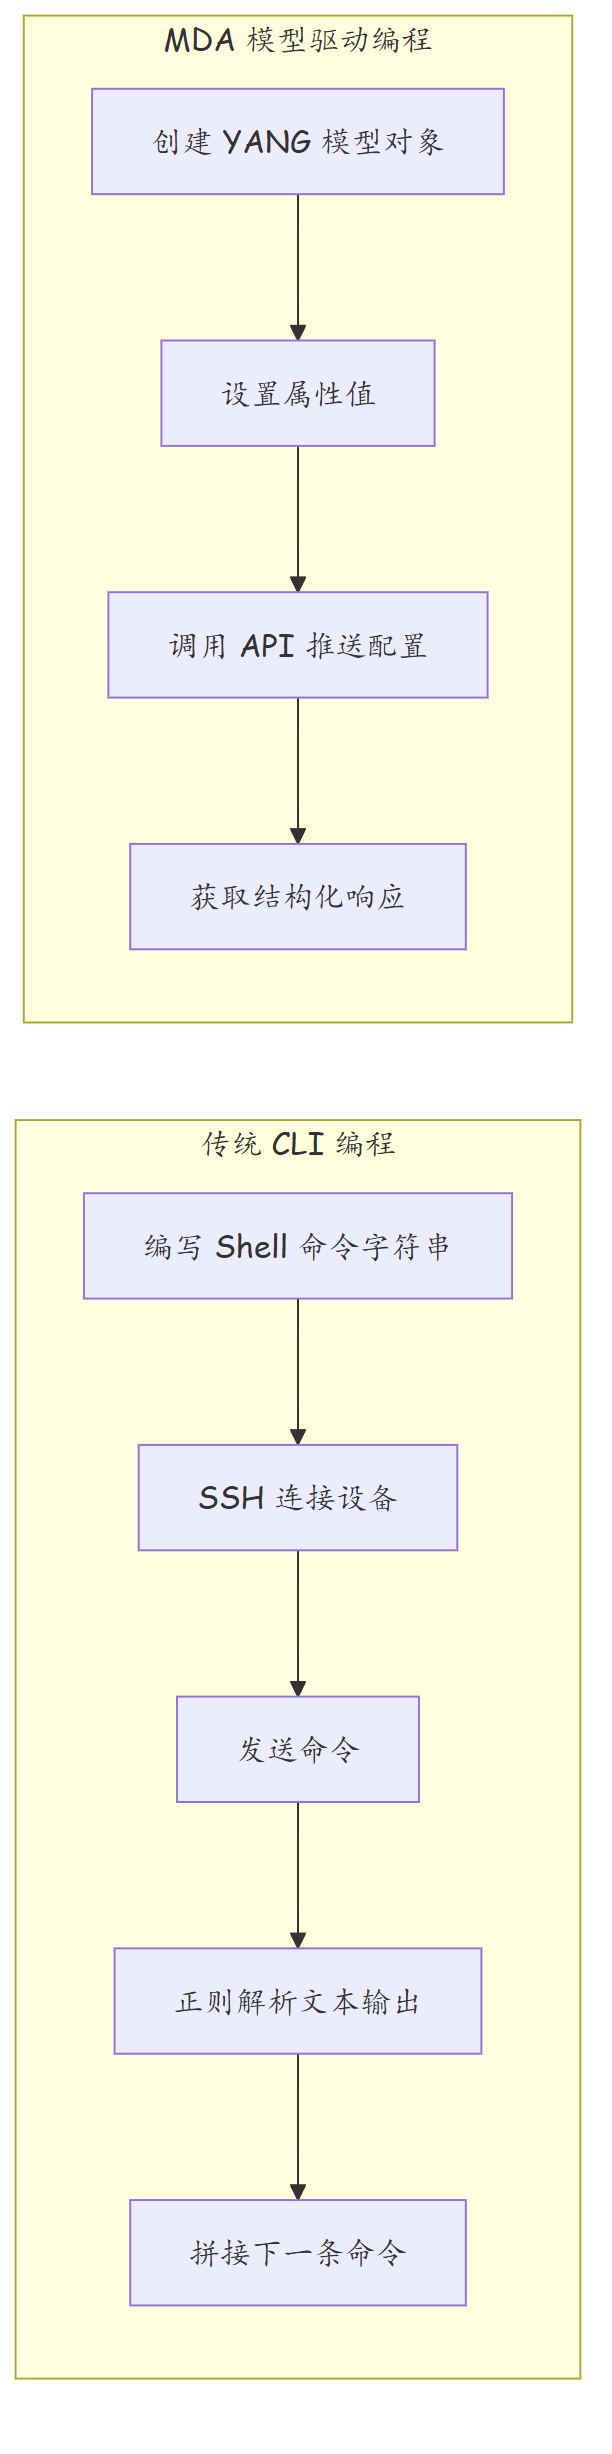
| 对比维度 | 传统 CLI 编程 | MDA 编程 |
|---|---|---|
| 数据类型 | 字符串(命令/输出) | 结构化对象(YANG 模型) |
| 错误检测 | 运行时(设备报错) | 编译时/运行时(类型校验) |
| 代码可读性 | 低(命令拼接) | 高(面向对象) |
| 调试难度 | 高(文本解析复杂) | 低(结构化数据) |
| 批量操作 | 手动循环 | SDK 内置批量方法 |
| 厂商绑定 | CLI 命令绑定 | YANG 模型绑定 |
三、技术细节
3.1 华为 eSDK Python 安装与环境配置
# 安装华为 eSDK Python
$ pip install huawei-nesdk

# 或者安装特定组件
$ pip install huawei-esdk-netconf
$ pip install huawei-esdk-common

# 验证安装
$ python -c "from huawei_nesdk import *; print('eSDK 安装成功')"
3.2 设备连接与会话管理
# scripts/huawei_mda_connection.py
from huawei_nesdk import *

# ========== 方式一:NETCONF 连接 ==========
def create_netconf_connection(device):
    """创建 NETCONF 连接"""
    conn = NetconfSession(
        host=device["host"],
        port=device.get("port", 830),
        username=device["username"],
        password=device["password"],
        timeout=device.get("timeout", 30),
    )
    conn.connect()
    return conn

# ========== 方式二:从设备清单文件加载 ==========
def load_inventory_and_connect(inventory_file):
    """从 YAML 文件加载设备清单并建立连接"""
    import yaml

    with open(inventory_file, "r", encoding="utf-8") as f:
        inventory = yaml.safe_load(f)

    connections = {}
    for device in inventory.get("devices", []):
        try:
            conn = NetconfSession(
                host=device["host"],
                port=device.get("port", 830),
                username=device["username"],
                password=device["password"],
                timeout=30,
            )
            conn.connect()
            connections[device["hostname"]] = conn
            print(f"✓ 已连接: {device['hostname']} ({device['host']})")
        except Exception as e:
            print(f"✗ 连接失败: {device['hostname']} - {e}")

    return connections

# ========== 方式三:连接池管理 ==========
class ConnectionPool:
    """设备连接池,避免频繁建立/断开连接"""

    def __init__(self, max_idle=10, timeout=300):
        self.pools = {}
        self.max_idle = max_idle
        self.timeout = timeout

    def get_connection(self, device):
        """获取或创建连接"""
        key = f"{device['host']}:{device.get('port', 830)}"
        if key in self.pools and self.pools[key].is_connected():
            return self.pools[key]

        conn = NetconfSession(
            host=device["host"],
            port=device.get("port", 830),
            username=device["username"],
            password=device["password"],
            timeout=30,
        )
        conn.connect()
        self.pools[key] = conn
        return conn

    def close_all(self):
        """关闭所有连接"""
        for key, conn in self.pools.items():
            try:
                conn.close()
            except Exception:
                pass
        self.pools.clear()

# 使用
pool = ConnectionPool()
conn = pool.get_connection({
    "host": "10.1.1.1",
    "username": "admin",
    "password": "HuaWei@123",
})
3.3 接口配置操作(MDA 方式)
# scripts/huawei_mda_interface.py
from huawei_nesdk import *

def configure_interface(conn, interface_config):
    """使用 MDA 配置接口"""
    # 构建配置 payload(YANG 模型结构)
    config = {
        "interface": {
            "name": interface_config["name"],
            "description": interface_config.get("description", ""),
            "admin_status": interface_config.get("admin_status", "UP"),
        }
    }

    # IP 地址配置
    if "ip_address" in interface_config:
        config["interface"]["ip"] = {
            "address": interface_config["ip_address"],
            "mask": interface_config["mask"],
        }

    # VLAN 配置
    if "vlan_mode" in interface_config:
        config["interface"]["port"] = {
            "link_type": interface_config["vlan_mode"],
        }
        if interface_config["vlan_mode"] == "access":
            config["interface"]["port"]["default_vlan"] = interface_config["access_vlan"]
        elif interface_config["vlan_mode"] == "trunk":
            config["interface"]["port"]["trunk_vlan"] = interface_config["trunk_vlans"]

    # 通过 NETCONF edit-config 下发
    result = conn.edit_config(config)
    return result

# ========== 批量接口配置 ==========
def batch_configure_interfaces(conn, interface_list):
    """批量配置多个接口(原子操作)"""
    config_list = []

    for iface in interface_list:
        config = {
            "interface": {
                "name": iface["name"],
                "description": iface.get("description", ""),
                "admin_status": "UP",
            }
        }

        if "ip_address" in iface:
            config["interface"]["ip"] = {
                "address": iface["ip_address"],
                "mask": iface["mask"],
            }

        config_list.append(config)

    # 批量下发(单次 RPC 调用)
    result = conn.edit_config(config_list)
    return result

# 使用示例
with create_netconf_connection({
    "host": "10.1.1.1",
    "username": "admin",
    "password": "HuaWei@123",
}) as conn:
    # 单个接口配置
    configure_interface(conn, {
        "name": "GigabitEthernet1/0/1",
        "description": "To-CoreRtr-Uplink",
        "ip_address": "10.2.2.1",
        "mask": "255.255.255.252",
    })

    # 批量接口配置
    batch_configure_interfaces(conn, [
        {
            "name": "GigabitEthernet1/0/2",
            "description": "To-AccessSW-01",
            "ip_address": "10.3.3.1",
            "mask": "255.255.255.0",
        },
        {
            "name": "GigabitEthernet1/0/3",
            "description": "To-AccessSW-02",
            "ip_address": "10.3.4.1",
            "mask": "255.255.255.0",
        },
    ])
3.4 BGP 配置(MDA 方式)
# scripts/huawei_mda_bgp.py
from huawei_nesdk import *

def configure_bgp(conn, bgp_config):
    """使用 MDA 配置 BGP"""
    bgp_payload = {
        "bgp": {
            "process": {
                "as_number": bgp_config["local_as"],
                "router_id": bgp_config.get("router_id"),
                "ipv4_unicast": {
                    "enabled": True,
                },
                "peer_groups": [],
                "peers": [],
            }
        }
    }

    # Peer Group 配置
    for pg in bgp_config.get("peer_groups", []):
        bgp_payload["bgp"]["process"]["peer_groups"].append({
            "group_name": pg["name"],
            "remote_as": pg["remote_as"],
            "description": pg.get("description", ""),
            "password": pg.get("password"),
            "ttl": pg.get("ttl", 1),
            "ebgp_max_hop": pg.get("ebgp_max_hop", 1),
            "address_family": pg.get("address_family", ["ipv4_unicast"]),
        })

    # Peer 配置
    for peer in bgp_config.get("peers", []):
        peer_entry = {
            "ip_address": peer["ip"],
            "remote_as": peer["remote_as"],
        }
        if peer.get("peer_group"):
            peer_entry["peer_group"] = peer["peer_group"]
        if peer.get("description"):
            peer_entry["description"] = peer["description"]
        bgp_payload["bgp"]["process"]["peers"].append(peer_entry)

    # 下发配置
    result = conn.edit_config(bgp_payload)
    return result

# ========== BGP 配置示例 ==========
bgp_config = {
    "local_as": 65001,
    "router_id": "10.1.1.1",
    "peer_groups": [
        {
            "name": "IBGP-PEERS",
            "remote_as": 65001,
            "description": "iBGP 对等体组",
            "ebgp_max_hop": 3,
            "address_family": ["ipv4_unicast", "ipv6_unicast"],
        },
        {
            "name": "EBGP-PEERS",
            "remote_as": 65002,
            "description": "eBGP 对等体组",
        },
    ],
    "peers": [
        {"ip": "10.2.2.2", "remote_as": 65001, "peer_group": "IBGP-PEERS"},
        {"ip": "10.2.2.6", "remote_as": 65001, "peer_group": "IBGP-PEERS"},
        {"ip": "10.3.3.2", "remote_as": 65002, "peer_group": "EBGP-PEERS"},
    ],
}

with create_netconf_connection(DEVICE) as conn:
    configure_bgp(conn, bgp_config)
3.5 查询设备状态信息
# scripts/huawei_mda_query.py
from huawei_nesdk import *

def query_device_info(conn):
    """查询设备基本信息"""
    queries = {
        "system": """
            <filter type="subtree">
                <system xmlns="urn:huawei:params:xml:ns:yang:huawei-system">
                    <hostname/><version/><uptime/>
                </system>
            </filter>
        """,
        "interfaces": """
            <filter type="subtree">
                <interfaces xmlns="urn:ietf:params:xml:ns:yang:ietf-interfaces"/>
            </filter>
        """,
        "bgp_summary": """
            <filter type="subtree">
                <bgp xmlns="urn:ietf:params:xml:ns:yang:ietf-bgp"/>
            </filter>
        """,
    }

    results = {}
    for name, filter_xml in queries.items():
        try:
            reply = conn.get_config(source="running", filter=filter_xml)
            results[name] = {"status": "success", "data": reply}
        except Exception as e:
            results[name] = {"status": "error", "error": str(e)}

    return results

def query_interface_statistics(conn, interface_name):
    """查询接口流量统计"""
    filter_xml = f"""
    <filter type="subtree">
        <interfaces xmlns="urn:ietf:params:xml:ns:yang:ietf-interfaces">
            <interface>
                <name>{interface_name}</name>
                <statistics/>
            </interface>
        </interfaces>
    </filter>
    """

    reply = conn.get(filter=filter_xml)
    return reply

def query_bgp_neighbors(conn):
    """查询 BGP 邻居状态"""
    filter_xml = """
    <filter type="subtree">
        <bgp xmlns="urn:ietf:params:xml:ns:yang:ietf-bgp">
            <neighbors>
                <neighbor>
                    <neighbor-address/>
                    <state/>
                    <remote-as/>
                </neighbor>
            </neighbors>
        </bgp>
    </filter>
    """

    reply = conn.get(filter=filter_xml)
    return reply

# 使用
with create_netconf_connection(DEVICE) as conn:
    info = query_device_info(conn)
    stats = query_interface_statistics(conn, "GigabitEthernet1/0/1")
    bgp = query_bgp_neighbors(conn)
3.6 配置生成器(ConfigGen)
华为 eSDK 提供了配置生成器,基于 YANG 模型和模板数据自动生成设备配置:
# scripts/huawei_configgen.py
from huawei_nesdk import *
import json

def generate_config(configgen, device_template, parameters):
    """使用 ConfigGen 生成配置"""
    # configgen = ConfigGen()
    # configgen.load_template(device_template)
    # config = configgen.generate(parameters)
    # return config

    # 简化版:基于字典模板生成
    config_lines = []

    for section in device_template:
        if section["type"] == "interface":
            for iface in parameters.get("interfaces", []):
                config_lines.append(f"interface {iface['name']}")
                if "description" in iface:
                    config_lines.append(f"description {iface['description']}")
                if "ip_address" in iface:
                    config_lines.append(
                        f"ip address {iface['ip_address']} {iface['mask']}"
                    )
                if iface.get("vlan_mode") == "trunk":
                    config_lines.append("port link-type trunk")
                    config_lines.append(
                        f"port trunk allow-pass vlan {' '.join(str(v) for v in iface.get('trunk_vlans', []))}"
                    )
                config_lines.append("")

        elif section["type"] == "bgp":
            bgp = parameters.get("bgp", {})
            config_lines.append(f"bgp {bgp.get('local_as', '')}")
            if "router_id" in bgp:
                config_lines.append(f"router-id {bgp['router_id']}")
            for peer in bgp.get("peers", []):
                config_lines.append(f"peer {peer['ip']} as-number {peer['remote_as']}")

        elif section["type"] == "vlan":
            for vlan in parameters.get("vlans", []):
                config_lines.append(f"vlan {vlan['id']}")
                if "name" in vlan:
                    config_lines.append(f"description {vlan['name']}")
                config_lines.append("")

    return "\n".join(config_lines)

# 使用示例
device_template = [
    {"type": "vlan"},
    {"type": "interface"},
    {"type": "bgp"},
]

parameters = {
    "vlans": [
        {"id": 10, "name": "Management"},
        {"id": 20, "name": "Servers"},
    ],
    "interfaces": [
        {"name": "GigabitEthernet1/0/1", "description": "Uplink",
         "ip_address": "10.2.2.1", "mask": "255.255.255.252"},
    ],
    "bgp": {
        "local_as": 65001,
        "router_id": "10.1.1.1",
        "peers": [
            {"ip": "10.2.2.2", "remote_as": 65002},
        ],
    },
}

config = generate_config(None, device_template, parameters)
print(config)
四、实战配置/案例分析
4.1 案例一:批量设备初始化部署
场景:新交付 100 台交换机,需要统一初始化配置(主机名、SNMP、NTP、VLAN、接口)。
# scripts/batch_device_init.py
from huawei_nesdk import *
import yaml
import json
from concurrent.futures import ThreadPoolExecutor, as_completed

def initialize_device(conn, init_params):
    """单台设备初始化"""
    configs = []

    # 1. 系统配置
    configs.append({
        "system": {
            "hostname": init_params["hostname"],
            "domain-name": init_params.get("domain", "local"),
        }
    })

    # 2. SNMP 配置
    configs.append({
        "snmp": {
            "agent": {
                "enabled": True,
                "community": init_params.get("snmp_community", "public"),
                "trap": {
                    "enabled": True,
                    "target": init_params.get("snmp_trap_host"),
                }
            }
        }
    })

    # 3. NTP 配置
    if init_params.get("ntp_servers"):
        configs.append({
            "ntp": {
                "enabled": True,
                "servers": init_params["ntp_servers"],
            }
        })

    # 4. VLAN 配置
    for vlan in init_params.get("vlans", []):
        configs.append({
            "vlan": {
                "vlan_id": vlan["id"],
                "description": vlan.get("name", ""),
            }
        })

    # 5. 接口配置
    for iface in init_params.get("interfaces", []):
        config = {
            "interface": {
                "name": iface["name"],
                "description": iface.get("description", ""),
            }
        }
        if "ip_address" in iface:
            config["interface"]["ip"] = {
                "address": iface["ip_address"],
                "mask": iface["mask"],
            }
        configs.append(config)

    # 批量下发
    for config in configs:
        conn.edit_config(config)

    return True

def initialize_device_via_pool(device, init_params):
    """通过连接池初始化单台设备"""
    conn = None
    try:
        conn = create_netconf_connection(device)
        return initialize_device(conn, init_params)
    finally:
        if conn:
            conn.close()

# 批量执行
def batch_initialize(inventory_file, init_template):
    """批量初始化设备"""
    with open(inventory_file, "r", encoding="utf-8") as f:
        inventory = yaml.safe_load(f)

    results = []
    with ThreadPoolExecutor(max_workers=5) as executor:
        futures = {}
        for device in inventory["devices"]:
            params = {
                **init_template,
                "hostname": device["hostname"],
            }
            future = executor.submit(
                initialize_device_via_pool, device, params
            )
            futures[future] = device["hostname"]

        for future in as_completed(futures):
            hostname = futures[future]
            try:
                success = future.result()
                results.append({"hostname": hostname, "status": "success"})
                print(f"✓ {hostname} 初始化成功")
            except Exception as e:
                results.append({"hostname": hostname, "status": "error", "error": str(e)})
                print(f"✗ {hostname} 初始化失败: {e}")

    return results

# 初始化模板
INIT_TEMPLATE = {
    "domain": "example.com",
    "snmp_community": "MyCommunity2024",
    "snmp_trap_host": "10.100.1.10",
    "ntp_servers": ["10.100.1.1", "10.100.1.2"],
    "vlans": [
        {"id": 10, "name": "Management"},
        {"id": 20, "name": "Servers"},
        {"id": 100, "name": "Uplink"},
    ],
    "interfaces": [
        {"name": "GigabitEthernet1/0/1", "description": "Uplink-Port",
         "ip_address": "10.10.10.2", "mask": "255.255.255.0"},
    ],
}

batch_initialize("devices/new_devices.yaml", INIT_TEMPLATE)
4.2 案例二:故障案例——MDA 配置下发部分成功
故障现象:批量下发 10 项配置,前 5 项成功,后 5 项失败。设备处于部分配置状态。
故障根因:
- NETCONF edit-config 默认不支持跨模块原子事务
- 多个 edit_config 调用之间没有事务保护
- 失败后没有回滚机制
修复方案:
# scripts/mda_atomic_config.py
from huawei_nesdk import *

def atomic_multi_config(conn, config_list, rollback_on_error=True):
    """原子多配置:全部成功或全部回滚"""

    # Step 1: 备份当前配置
    backup = conn.get_config(source="running", filter=None)

    # Step 2: 合并所有配置为单次 RPC
    merged_config = {}
    for config in config_list:
        merged_config.update(config)

    try:
        # Step 3: 单次 RPC 下发(原子性由设备保障)
        conn.edit_config(merged_config)
        print("✓ 全部配置下发成功")
        return True

    except Exception as e:
        print(f"✗ 配置下发失败: {e}")
        if rollback_on_error:
            try:
                # Step 4: 回滚到备份配置
                conn.edit_config(backup)
                print("✓ 已回滚到变更前状态")
            except Exception as rollback_err:
                print(f"✗ 回滚也失败: {rollback_err}")
        return False
预防措施:
| 措施 | 说明 |
|---|---|
| 合并配置 | 将多个配置项合并为单次 edit_config 调用 |
| 使用 candidate | 先写入 candidate,验证后 commit,支持回滚 |
| 变更前备份 | 保存完整 running 配置,失败时回滚 |
| 分段下发 | 按依赖关系分组,先下发基础配置(VLAN),再下发依赖配置(接口) |
五、总结
| MDA 特性 | 说明 | 与传统方式对比 |
|---|---|---|
| 模型驱动 | 基于 YANG 模型操作设备 | 比 CLI 命令更结构化 |
| 面向对象 | 设备/接口/VLAN 等作为对象操作 | 比字符串拼接更清晰 |
| 批量操作 | 单次 RPC 下发多配置 | 比逐条命令更高效 |
| 类型安全 | SDK 校验数据类型和约束 | 比手动检查更可靠 |
| 连接管理 | 内置连接池和会话管理 | 比手动管理连接更省心 |
| 最佳实践 | 说明 |
|---|---|
| 连接复用 | 使用连接池管理设备连接,避免频繁建立/断开 |
| 批量合并 | 合并多配置为单次 RPC,减少网络往返 |
| 异常处理 | 实现完整的 try-except-finally,确保连接关闭和回滚 |
| 配置备份 | 变更前备份 running 配置,支持快速回滚 |
| 日志记录 | 记录每次配置操作的时间、内容和结果 |
| 幂等设计 | 配置脚本支持重复执行(幂等),避免因中断导致不一致 |
思考题
- MDA 框架将 YANG 模型映射为 Python 对象,这种设计的优势是什么?有什么局限?
- 在批量配置场景中,为什么推荐将多个配置合并为单次 RPC 调用?如果配置量很大怎么办?
- 华为 eSDK 和其他厂商的 SDK 在 API 设计上有什么异同?如何实现跨厂商的设备管理?
下篇预告:第318篇:用 Python 开发自动化巡检脚本